


If you have ever turned on HGTV or taken a stroll through Target recently you would see that Farmhouse decor is IN. One staple piece seen in many magazines that really takes a space from “just okay” to modern farmhouse is a wooden beam that runs across the ceiling.
Exposed structural beams are all the rage right now. Unfortunately, many homes were built when this wasn’t the case, but that doesn’t mean that you’re out of options!
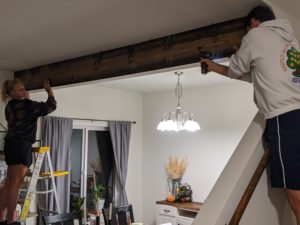
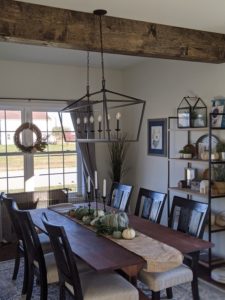
My husband and I bought our first home last December, and from the moment we first toured the house I knew I wanted an exposed beam in our dining room. My husband finally caved, and this weekend in a matter of hours and for around $70 dollars it was complete! See the before and after photos below.

Materials for your Farmhouse Faux Beam
- Drywall Screws
- Wood Stain
- Drill and drill bits
- Sandpaper or Power sander
- 2 1x6x10 (for the sides)
- 2 1x8x10 (for top and bottom)
Note: The board dimensions are what we recommend! However, you can use whatever boards you want!
How to make your own exposed faux beam:
Step 1: Measure your space for your faux beam.
You need to know the exact measurements you need. The age-old rule is to measure twice, cut once. We did not follow our own advice and ended up cutting twice. Lugging that long plank through the tight turns and stairs in our home was tedious. So, take the advice we didn’t – measure more than once to be sure!
While you’re up there measuring, use a pencil to mark where you want the beam to go!
Measurements Needed:
-You will want to measure from wall to wall at the crease where the ceiling meets the wall.
-You will also need to decide on the width of your beam. I recommend just making it the width of a board. If you do this, then you won’t need to make additional cuts.
Pro Tip: Grab a buddy and have them help you hold the measuring tape straight. If the tape sags even a little, it can throw off your measurements. (This is the problem we had!)
Step 2: Cut your wood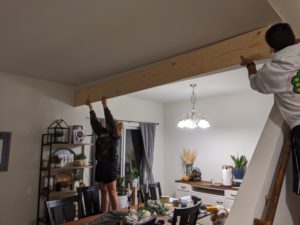
This is where having some tools can be a lifesaver. If you are an aspiring DIY’er and haven’t built up your tool base, let me recommend investing in a miter saw ASAP. We use a DEWALT compound miter saw, and we love it. You can also use a circular saw, but you need a pretty steady hand to make sure your lines are straight!
Pro Tip: If you don’t have a miter saw or a circular saw, occassionally you might be able to have your wood cut to size at some major home improvement stores. You need to check your local stores on their policies, but we have had them cut for us before!
Step 3: Sand and stain the wood for your faux beam
Sand your wood using sandpaper or a power sander. I would recommend using 180 grit to make it nice and smooth.
Using a stain on the wood is a must! We suggest using a stain that matches your floors or is a richer color. We used Minwax Jacobean Stain for our project. If you need help deciding on a stain, or learning about how to stain check our previous blog post!
Step 4: Assemble the Beam
We lucked out in our household. We already had an existing beam-like structure in our dining room, so all we needed to do was screw our wood panels right on to it.
Note: If you also have one of these, before screwing in use a magnet to double-check that this isn’t some important electrical or metal duct. If that is the case you might need to use shorter screws to attach it!
If you do not have an existing structure then assembly will look a little different for you! There are a couple of different ways you can do this. This is what we would recommend:
First, you need to put a base or mounting piece on the ceiling that will hold the beam.
Taking your cut-to-length wood piece screw it into the ceiling. If you use a stud finder, you can find where the joists are in the ceiling and this will allow your beam to be even more secure. If you do not have a stud finder, you can put in your screws in different places and at different angles to increase your chances of hitting one. You should be using your drywall screws for this part of the project.
Pro Tip: Save yourself some time. Your mounting board does not need to be stained or sanded because it will not be visible.
Second, you will want to pre-assemble and drill the “frame” of the faux beam.
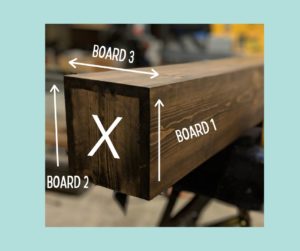
These are the three visible pieces. When the boards are assembled they will make 3 sides of a box. The picture below is not the beam we made for our house but is a great example of what this will look like. You can ignore the side with the X, you will not need that.
Along the top of your “U” shaped board, pre-drill holes for where this will attach to the mounting piece that is on the ceiling. Be generous with your screws. You want this to be secure! Additionally, it is a good idea to use a bit of scrap wood in the same thickness to line up where your pre-drilled holes are. This ensures that your
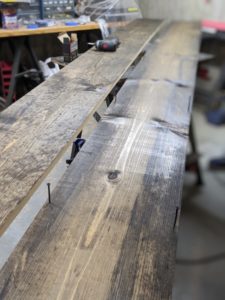
screws will be attaching to the mounting board!
The picture to the right demonstrats what it would look like to predrill and insert screws.
Pro Tip: This part works best with a buddy. Have them hold the wood up and together while you use a drill to screw in the screws.
Finally, install your U-Shaped faux beam to your mounting piece.
Have a friend or two help hold it up in place while you use the drill to screw in your screws! If you screw in your screws ahead of time slightly (not all the way) it’ll make it quicker to install. Your U-Shaped box just fit snug as a bug in a rug on either side of your mounting board.
After it’s screwed in, you’re done!
I love the beam and light.
As you mentioned, totally changed your dining room.
Awesome job!