
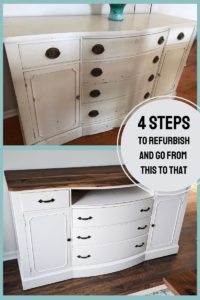
When we first moved into our new home in December I had big lofty dreams and plans on how to redo each room. Suddenly we have more space to put things, and we had a real dining room! Quickly, I realized buying brand new furniture for each room was not going to be in our budget. I set my sights on cheap furniture we could refurbish.
Planning the look of our refurbish buffet
After we built our dining room table, I really wanted to get a large buffet or credenza for the wall in our dining room. The challenge was finding something large, cheap, and would match our newly made dining room table.
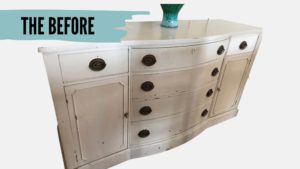
We found an antique buffet on Facebook Marketplace. The buffet table had clearly been “refurbished” once before. The owners painted over the original stain on the outside.
We planned to take the top off and give it a new one, switch out the handles, and give it a new coat of paint! The process of finishing it proved to not be as simple as my little DIYer heart dreamed.
Refurbish Step 1: Preparing the buffet
Clean:
The first thing we did was give the buffet a deep clean. I took all the drawers out and cleaned them down. We wiped down the inside of the cabinets and the exterior
Disassemble:
The second thing we did was take the top of the buffet off. Unfortunately, the top was glued on, not just screwed on. To get the top off we had to pry it. This would have been no biggie, but we needed the top to stay intact to use as a “stencil” for our new top we were making. Luckily, the buffet was old enough that the original glue that held it together had dried up. Once we got a wedge in, with a little tough love we were able to pry it
off in one whole piece. After we took the top off we also removed all of the hardware.
sanding:
The last step in preparing was some light sanding. We planned to paint the buffet, so we didn’t feel like we needed to sand it all the way down to its bare bones. The goal with sanding was to even the surface. There were some unique embellishments in the wood that we felt would be hard to sand around or if we sanded too aggressively would have come off. We opted to just paint over it. If I were to do it over again, I might have considered sanding it down because of a snare we ran into.
Refurbish Step 2: Painting the buffet
This is when we ran into our trouble. In my mind, I thought it would be a simple few coats of paint and done!
Problem with refurbishing antique furniture: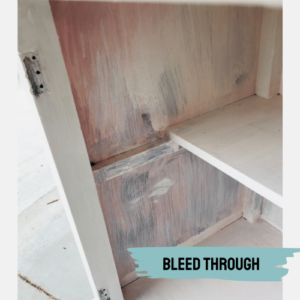
Occasionally when refurbishing furniture you will experience an issue called bleed-through. That is when the original varnish bleeds through the paint. Bleed-through is caused by the tannins in the original finish on the piece seeping through the paint. Older pieces of mahogany and cherry pieces almost always have issues with bleed-through.
In our situation parts of the buffet, like the inside of the cabinets, never had been painted. In a few sections on the buffet, there were paint chips that revealed the cherry under it. I gave the whole buffet a coat of paint. As the paint started to dry, any section where I painted over the cherry wood changed to pink. I thought it was a fluke, and let the paint dry. The pink tint continued to come through after the next coat of paint was on. I knew that it was not in fact a fluke after the 6th coat of paint.
How to stop bleed-through in refurbished furniture:
I used both primer, latex paint, and topcoat paint. All of them dried pink. Some research showed that spraying or putting on a coat of shellac was a potential solution. Thank goodness for Google coming to my rescue! I used spray shellac from Menards. I gave it a few good sprays and let it dry the recommended time. When the shellac dried, I added a coat of paint and it seemed to do the trick!
Refurbish Step 3: Making the new buffet top
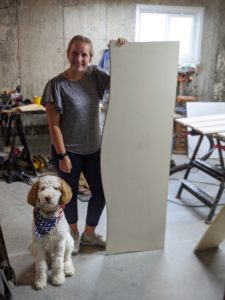
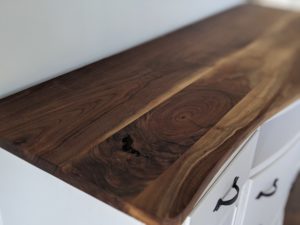
This step can be recreated at home for any level of skill. If you want a simpler method, you can always repaint the original top to complement the rest of the piece. In our case, we really wanted a walnut top that would match our new walnut dining room table. We happened to have some extra pieces of walnut left over from the table, so that is what we used! These are the steps we followed.
Plane the Wood
We needed all the wood to be the same size. Again, if you are wanting to do this with pine or another wood found at Menards you can skip this step! Generally, the wood at stores is cut all to the same size. We got our wood as rough saw from a mill, so it was very important we planed it down.
Assemble the Wood
We edge glued our pieces of wood together to create the tabletop. Edge-gluing is the process of lining up the seams of the wood and gluing them together. A little hack for you, you can find large sheets of edge-glued pine at Menards and Lowes. If you do not have the tools lying around to make this step simple for you at home, I would recommend buying the pre-edge glued pieces from one of the stores. To edge glue our pieces we used a biscuit joiner to create a better seal. After we joined all the pieces together we clamped it down and let it sit for 24 hours.
Epoxy the Holes
Another issue with our wood in our wood was the nicks and knots that created large holes. This would not be a necessary step with edge-glued pine from the store, but I didn’t want to skip something we did in the explanation! To match our table to our buffet we used the same epoxy resin to fill it in. We may do a more detailed post about epoxy resin at another time. We used the Art ‘N Glow brand of epoxy resin and added some black dye, and let it cure the recommended time.
Sand and Cut to Size
Once our piece was all ready for the finishing steps, we sanded the top down to 180 grit. One of our best investments in my opinion is our power sander. It saves so much time when sanding large projects.

Once sanded, we laid the original top on top of our new one. We traced in pencil around the edges of the original top to give us a cut line for our new one. We used a circular saw to follow the line.
Finishing the Top
It was important for us to add some kind of finishing product to protect our walnut wood. We used the same product that we used on our table, Rubio Monocoat, to match it. We happened to have some leftover from our original project. A budget-friendly finisher would be polyacrylic or polyurethane. This is more affordable and is a better budget option if you are sealing pine and not hardwood. Can’t be at the price difference of $50 vs. $10. If you simply painted your top, there is no need for a sealant unless you are going to be rough with the buffet and fear chipping.
Refurbish Step 4: Reassemble the buffet
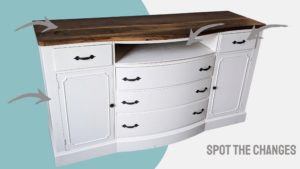
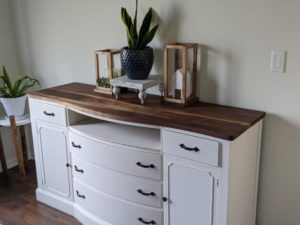
Once everything was painted, and dried, we first put the drawers back in and screwed on our new handles. I wanted to be budget-friendly, so I looked through all of the sale handles and Lowes and found mine for less than a dollar apiece! Handles can get very pricey if you aren’t careful, but new handles do provide a beautiful facelift to the piece.
After the drawers and cabinet doors were reattached, we reattached the new tabletop. Jacob used some hidden pocket holes to screw it on. This ended up being our finished product:
A final note on refurbishing:
If you are wanting to do this on a more budget-friendly route, I would recommend salvaging your current top. We happened to have walnut laying around and the tools needed to put the walnut to use! If you are really wanting to create the “wood top” look but want to remain affordable, then using pine with a darker stain can also yield beautiful results!
If you have any questions about how to refurbish something or questions on what we used, feel free to leave us a comment. You can also go to our contact page and leave us a message there!